Thanks to everyone who came out to the first cyclocross practice last night!
I saw lots of progress being made, and some fears being conquered. I mean, everyone rode over that log? How cool is that?
Yeah, ok, fine… most of you reading this have absolutely no idea what I’m talking about, but suffice to say some people pushed themselves way outside their comfort zone last night, and it paid off.
Very darn cool.
We’ll be back next week, and I hope to see more of you out there!
Today, well… we’re going to do a bit of running. Yay!
Today, we’re going to assume you’ve been running a bit already this season, and – as promised last Thursday – we’re doing another stairs workout.
Yup.
It’s…
Stairing, part deux.
First, find some stairs, or a small hill, or a grassy knoll – something you can run up. Stairs are best, but whatever you can come up with will work.
You don’t need NFL stadium stairs or anything crazy like that. Look for something that’s long enough to give you 10 seconds of running at a full sprint; That’ll be plenty long enough. We’re doing speed work, here. Short, sharp efforts.
Got a location?
Cool.
Get on your bike and warm up for 15 minutes or so. Maybe ride on out to wherever you’re doing these.
Mosey on over to your stairs/knoll/whatever, and get set. Stretch, have a sip of water, turn up the volume on your Ipod.
Jog up the stairs. Walk down.
Get a sense for the spacing and “feel” of the stairs. You’re going to be flying up these things in a full-on lactic acid bath shortly, so you want to get comfortable with the terrain so you don’t lose your footing when you’re attacking the intervals in a couple/few minutes.
– Repeat x5
– Sprint! up stairs, fast, using whatever stride is most comfortable. Walk down.
– Repeat x5
Rest for 1 minute, walking slowly up and down stairs.
– Sprint up stairs, this time using quick, tiny strides, 1 stairstep at a time. Walk down.
– Repeat x5
Rest again, same as before.
– Sprint up stairs, this time using long strides, several stairsteps at a time. Walk down.
– Repeat x 5
Rest again.
– Sprint up stairs, combining the previous two exercises – 1st time up, long strides; next time up, short strides, etc. Walk down.
Rest again, 2-5 minutes.
If this is your first time running stairs this season, that’s it. You’re done. Feel free – heck, feel obligated to stop early if you have any tweaks, twinges, or strange feelings in your legs.*
If you’ve got some running miles in ya’ already, repeat the entire damn thing until you just can’t do it anymore, or until you are going so slowly it’s ridiculous.
Get back on bike, spin out your legs, go home.
Notes –
The idea here is to get good enough at this to go really damn hard. If you do this right, it’s a brutal workout.
Don’t go that hard if it’s your first (or nearly first) time running stairs this season. Keep it under control. You want to build up to the point where you are going up the stairs in a dead sprint, and are completely gassed at the end of each set.
We’re going to do this exercise – or a variation of it – every week for a while, so be patient. You will get better at it, and I will throw in some variations that will keep it fun and challenging, including some agility and lateral stability drills. Stay tuned!
Hey! Go Check out…
Coaching for Cyclocross and all your other bike-related activities!
If you’re in the Seattle area, come on out and practice your skills with a whole bunch of us at…
Not from around these parts? Can’t make it out?
No sweat.
Give this a shot…
1 – warm up for 10 minutes.
2 – Stretch out after you’re warm. . Pay special attention to all the muscles used in those movements you make hopping on and off the bike that are different from what you usually do.
3 – Dismount/remount skills for 15 minutes.
– Start at literally a walking pace, and slowly increase speed until you can mount and dismount the bike smoothly and perfectly at full speed. Do not jump on and off the bike, you are looking to smoothly slide yourself on and off.
We worked on the basics of the dismount a week or so ago. Feel like you need a bit of a refresher? Check out the post here.
Do just the most basic dismount/remount as per above until you have it wired, smooth at all speeds. When you are feeling confident, add some barriers to the session…
– Again, start at a super, super slow speed.
– Approach the barrier, dismount smooth as silk.
– Step over the barrier, paying attention to how you lift the bike, and how you place your feet.
– Remount. Again, think smoooooth….
– Start with a single barrier, move to a double, and keep going slow until you have things wired. Then, speed things up until you aren’t smooth, back it down 1 notch, and make it smooth.
(If you don’t have barriers, anything will do. Use a log, put a stick on the ground – whatever.)
4- Shouldering the bike.
Start with the basic dismount, as you’ve been working on.
Back things up a bit, and dismount again, but really focus on the “drift” phase of the dismount, where you are still clipped in with one foot, your off-side foot has already swung over the saddle, and you are coasting with your left hand on the bars and your right hand on the top tube.
Concentrate on the moment where your left foot unclips, and you drop to the ground. Try to coast with both feet unclipped, weight transferred onto the bike through your hand on the top tube, and your right ass-cheek against the side of the saddle.
Drop to the ground, literally. No big step, nothing dramatic, just drop to the ground.
– I don’t care if you “cowboy” your dismount, or “step-through” (right foot passes between left leg and frame.) Ideally you will work on both, and be equally competent, but there are riders on the World Cup circuit who never do a step through dismount, so… whatever.
Repeat, trying to coast with your weight on the top tube for a longer and longer period of time.
Got it wired?
Good.
This time, drop to the ground and swing the bike up onto your shoulder using the hand on the top tube (next week, down tube grab shouldering. Don’t worry about it right now.)
– Use both a palm-up and a palm-down grip on the top tube. Figure out which one works best for you.
– as you shoulder the bike, think about how you are going to carry it. There are really only two good options…
1 –& 2 –
It doesn’t really matter which one you choose, they both have their advantages. Just pick one. If you don’t look like one of these two pictures when the bike is on your shoulder… well, you should.
So, the bike is on your shoulder.
Run.
It doesn’t have to be uphill (we’re working on the skill, not the fitness, and you’re doing stairs tomorrow…) but it helps.
Whatever. Just run a few steps.
Place the bike gently on the ground. Don’t drop it, slam it down. Just place it.
Remount.
Repeat the whole cycle until you’re sick of it, then on to…
5 – turning and handling skills for 10-15 minutes.
– work on tight, high speed turns as well as super tight low speed turns. Roll some off camber slopes, and learn to turn on them as well.
– Put two traffic cones about 10 feet apart from each other, and ride a figure eight around them, pedalling the entire time.
Make the turns tighter and tighter until you can’t hold the line and you fall down. Learn where the break point is between riding a tight line and falling on your ass, and push that line until you are definitively over it.
6 – Finish the night with two 5-minute efforts on relatively easy terrain.
– “Easy” as in a loop on grass with some tight-ish turns on it, or some pretty buffed double-track.
– Go hard, and work on accelerations out of the turns.
– Every time you slow down entering a turn, get on the gas on the way out of it, ass out of the saddle, working hard.
– 5 minutes full gas, rest for 5 minutes, then go for 5 again.
Ok, maybe not. But if you’ve been following along with us in previous years, I’m betting you got the joke.
“Joke? What joke?” you ask.
Oh poor soul, the joke is this; Tuesdays around here are rough.
Rough, because it’s…
Two By Twenty Tuesday!
Pretty simply, the 2×20 looks like this:
– Warm up.
– Go as hard as you can for 20 minutes.
– Recover for 5 minutes.
– Go again for another 20 minutes.
That’s the basic version. Success on this is, however, all in the details.
First of all, warm up.
No, seriously. Don’t just hop on the bike and blast one out.
Warming up makes a difference, especially if you’re doing this as a test session… and, ideally, every time you do these, it’s doubling as a test session (we talked about this last week.)
You don’t need to do anything super hard or super involved, just make sure the legs are up and running before you kick off the workout proper.
Spin for a bit, blast a couple of 30 second to 2 minute efforts off pretty hard, spin a bit more, then go for it.
When you do go for it, really go for it.
But in a controlled sort of way.
The idea here is to go as hard as you can for the duration of both intervals without being forced to go easier at the end of the second interval. If you run out of gas before you finish the second interval, you went to hard. If your vision isn’t blurry at the end of the second interval, you went too easy.
If you’re doing this with a powermeter, you want your wattage output to be as close to constant as possible. How constant?
Can you keep it in a 10 watt range?
Probably not.
15 watts?
More likely
20 watts?
Try.
Keep it steady.
These take practice to do well, and the better you get, the harder they get (you’re welcome.) This is a workout that’s a natural for the turbo trainer, and that’s how I do ‘em.
This is a good thing, because I always wind up flat on my back on the floor trying not to puke after the 2nd interval.
I’m really not kidding about the blurry vision thing. You should aspire to seeing-spots level of output on these.
If you can learn to push through your limits, really push, you will get better and you will get better fast.
It’ll be painful, though.
I promise.
Have fun!
M
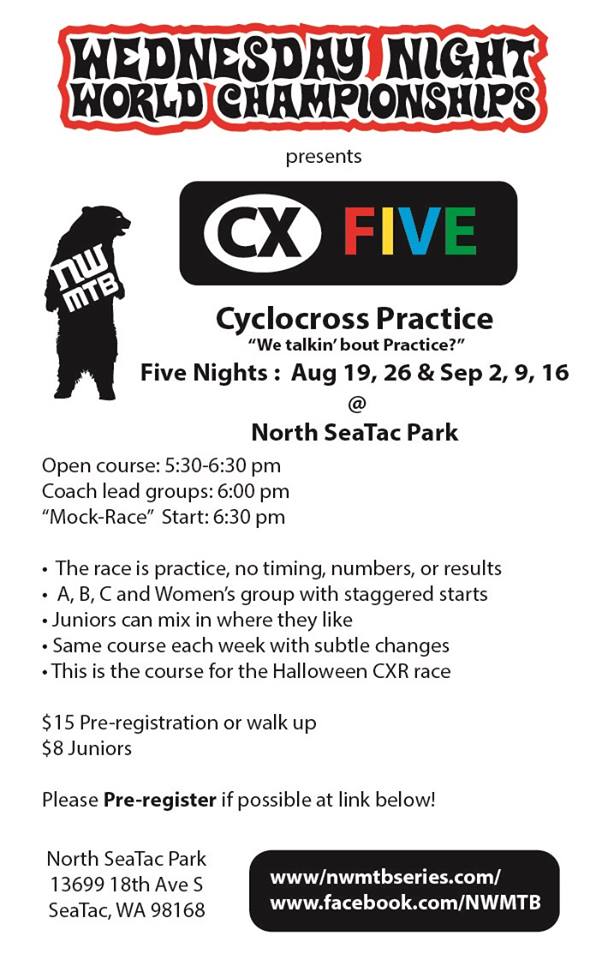
Wednesday Night Cyclocross Practices begin out at the revamped North Seatac course tomorrow, C’mon out!
Well it’s Sunday, and after a couple of days of rain, we’re back to the bright sunshine and unusual heat we’ve been enjoying(?) up here in Seattle.
Much like yesterday – and, ok, last weekend – if you’ve got the time, I’d suggest taking advantage of the season to get out there on your bike and go long today.
Or getting some family time in.
Or going for a short run.
Or, well… I’ve posted up lots of options for your weekend, pick one! 🙂
Today, I’m partial to the long ride option.
Get some miles in while you can, while the weather is nice and there aren’t any races to worry about.
One of the best things about being a cross racer is that you get to do your long training rides when the weather is nice, and you’re doing short races when the weather is terrible.
Sounds about right, eh?
Let’s face it, suffering through those training slogs on the weekends in November with the dedicated roadie-types is for the birds.
So, get out there and have some fun in the sun. Go long, keep it steady, and store up some training miles in your legs.
More specific workouts for the weekends start next week.
I’m getting this up a bit late (sorry!) so it’s a safe bet that many of you are already out on the bike, hopefully doing something Epic.
(Yup. That’s a hotlink. Go ahead and click it)
There aren’t many more Cyclocross free weekends left, so take advantage of the few there are to get some miles in, and have some fun doing so.
Having said that, there’s also a really good chance that if you’ve been working hard all year, this is one of the few weekends left to take it easy before the demands of racing start to monopolize your weekends.
Every. Single. One. Of. Them.
It’s going to be a long haul to the end of the CX season, so pace yourself.
If you’re one of the many folks with family obligations…
…or a significant other-type person, maybe spend a bit of time with them.
They know they aren’t going to see you much on the weekends for the rest of the year, so maybe give ’em a bit of your time now.
This sort of advice may seem kinda’ foreign to most people’s idea of what a “training blog” should be, but I’ll tell ya something; when I’m actually coaching people, something like figuring out how the heck a client can find time to spend with their family is pretty darn important.
Even if it goes unsaid much of the time.
Don’t forget this side of things, ok? It’ll probably make you – and everyone else – happier in the short term, and make your training easier in the long run.
Win/win.
Sermon being over, what should you do training-wise today?
Well, if you clicked the link above, you know that having another big weekend on the bike is a good option for many today.
I hope you didn’t have the insane week that I did. Sometimes, you just should have stayed in bed.
For the whole damn week.
The week past was a seemingly endless compendium of seized bottom brackets, loctited crank bolts, bad traffic, lost rent checks, and my neighbor blowing cigarette smoke through the open window of my apartment at 2 in the morning.
Every. Single. Morning.
It was a cheater bar kinda week, and the lever never seemed long enough.
Those will happen, eh?
So, you know what I’m doing for a workout today?
Absolutely nothing.
I’m taking the day off.
Especially since I’m hoping to have another Epic Weekend the next couple of days, today I’m trying to get my bearings back, re-set, and recover.
You might think about doing so as well.
Today’s workout?
Nothing. Take a day off the bike.
Well, ok… we talked about running yesterday, and if you’re now on the “run a tiny little bit every day for the next week” plan, then yeah; you’re doing that today.
…and, of course, if you did the big stairs workout that was the alternate workout yesterday, then you should probably look to spin your legs out a bit today.
Crap.
Better put something up for that.
Here goes.
The day after a hard running workout – especially if you’re doing stairs – I think it’s a good idea to do wee bit of dedicated leg speed work. Note: leg speed, not bike speed. There’s a difference.
One of the things that seems to happen when you throw running workouts into a cyclist’s routine is that they tend to get heavy legs, and lose a bit of that souplesse that’s been developed over months and years of dedicated bike training.
Can’t have that.
So if you ran hard yesterday, today you do some…
Spin Ups –
– Get on your bike and warm up with a leisurely spin, 10-20 minutes.
– After you’re warm, find a nice, long, flat or slightly downhill section of road with little or no traffic.
– Begin interval by rolling into it at a moderate speed, in a gear that’s smaller than you would typically use to sprint.
– Get out of the saddle and sprint.
– Spin the gear up out of the saddle. When your leg speed gets to the point where it’s hard to maintain, sit down and keep going until you are totally spun-out. We’re talking fast, can’t turn ‘em over any faster…
Think Road-Runner fast…
– Repeat x 3-5
Recover for 5 minutes, rolling around at a leisurely pace.
– Go again, same thing.
Recover, then repeat as time and fitness allow. Shoot for 3-5 sets of 3-5.
For the vast majority of people, what I outlined in that piece applies, and what you should be doing today is some variation on the theme of “run down to the end of the block and then back”.
If that’s where you are with your running, don’t try and pretend you’re at some other point and go out and flog yourself. As discussed in the link, if you do that you’re likely to hurt yourself, or at least put yourself on the couch for a few days.
Neither one of these is conducive to building form, or racing well in a couple/few weeks.
Here’s an idea, though…
If you’re doing really short runs, you can pretty much run every day.
I mean, we’re talking maybe ten minutes, right?
Most people can find a way to shoehorn ten minutes into their schedule to literally run down to the end of the block. And back.
Give five minutes to your running today and tomorrow.
Then 6 minutes on the third day.
Then 7 the next.
Then 8.
See the pattern?
Do this for a week or so – stopping before you start to get sore, every time – and then we can throw something a little bit harder into the mix.
What’s that you say?
You’ve already been running a fair bit?
You want to try something harder now?
Okey doke.
How about some some stair work today?
First, figure out where you can do the workout. Since we’re going to be running stairs, you probably need some stairs…
…or a small hill, or a grassy knoll – something you can run up. Stairs are best, but whatever you can come up with will work.
You don’t need NFL stadium stairs or anything crazy like that. Look for something that’s long enough to give you 10 seconds of running at a full sprint; That’ll be plenty long enough. We’re doing speed work, here. Short, sharp efforts.
Got a location?
Cool.
Get on your bike and warm up for 15 minutes or so. Maybe ride on out to wherever you’re doing these.
Mosey on over to your stairs/knoll/whatever, and get set. Stretch, have a sip of water, turn up the volume on your Ipod.
Jog up the stairs. Walk down.
Get a sense for the spacing and “feel” of the stairs. You’re going to be flying up these things in a full-on lactic acid bath shortly, so you want to get comfortable with the terrain so you don’t have any… problems…
– Repeat x5
– Sprint! up stairs, fast, using whatever stride is most comfortable. Walk down.
– Repeat x5
Rest for 1 minute, walking slowly up and down stairs.
– Sprint up stairs, this time using quick, tiny strides, 1 stairstep at a time. Walk down.
– Repeat x5
Rest again, same as before.
– Sprint up stairs, this time using long strides, several stairsteps at a time. Walk down.
– Repeat x 5
Rest again.
– Sprint up stairs, combining the previous two exercises – 1st time up, long strides; next time up, short strides, etc. Walk down.
Rest again, 2-5 minutes.
If this is your first time running stairs this season, that’s it. You’re done. Feel free – heck, feel obligated to stop early if you have any tweaks, twinges, or strange feelings in your legs.*
If you’ve got some running miles in ya’ already, repeat the entire damn thing until you just can’t do it anymore, or until you are going so slowly it’s ridiculous.
Get back on bike, spin out your legs, go home.
Notes –
The idea here is to get good enough at this to go really damn hard. If you do this right, it’s a brutal workout.
Don’t go that hard if it’s your first (or nearly first) time running stairs this season. Keep it under control. You want to build up to the point where you are going up the stairs in a dead sprint, and are completely gassed at the end of each set.
We’re going to do this exercise – or a variation of it – every week for a while, so be patient. You will get better at it, and I will throw in some variations that will keep it fun and challenging, including some agility and lateral stability drills. Stay tuned!
Hey! Go Check out…
Coaching for Cyclocross and all your other bike-related activities!
[My apologies. Please click on the headline above to read this post as a single page. This will resolve the formatting issues that I can’t seem to make go away.]
It’s Wednesday, and what you’ll discover if you play along with us for a while (or already know, if you’ve been with us in previous seasons) is that on Wednesday, we typically do a bit of skills work.
Since I’m a slave to tradition, we’re going to continue that one today, and jump right into things with a re-post of last season’s piece on that most basic of skills, clipping in and out of your pedals.
It’s…
The Hokey-Pokey Redux, Redux.
(or, left foot in, left foot out, that is what it’s all about.)
Fair warning: this is about as dweebish as it gets. It’s also (largely) a re-write of a post from previous seasons. If you find yourself actually wanting to read more on the subject, and similar subjects, enter “Wednesday” into the search box on the lower right side of this page. If you wade through the posts that come up, you’ll find a pretty high volume of skills posts. Lots of words, some pretty pictures.
Mostly words.
Anyways, onwards!
————————————————-
First, lets look at the Pedal/Shoe interface –
All of the clipless pedals commonly used for cyclocross operate on the same basic principles.
A cleat –
Is held in place in a pedal…
…by a hook at the front of the pedal, and a gate at the rear. *
The gate is spring-loaded, in an orientation that provides for extremely high resistance to force in the vertical plane, and extremely low resistance in the horizontal.
The cleat/pedal interface is designed so that lateral or medial rotation of the foot overcomes the spring tension holding the gate portion of the pedal in place, releasing the cleat and allowing for vertical disengagement.
The factors that limit the proper functioning of the pedal in release mode are these –
– Force necessary to overcome spring tension of gate
Can the lateral/medial motion of the foot produce enough force to overcome the spring tension of the gate?
– Range Of Motion (ROM)
Can the foot produce a wide enough range of lateral/medial motion to overcome the spring tension of the gate?
– Resistance multipliers
The resistance of the pedal gate to lateral/medial motion is designed to be low, but several factors can cause substantial increases in the actual force necessary to release from the pedal. For EG –
– Contamination by foreign media
Mud, grit, crap of all sorts in pedals/shoes can jam spring mechanism
– Out of plane cleat motion in act of release
If the foot/cleat is pronated/supinated in the attempt to release from the pedal, it introduces a vertical force component to the cleat/pedal interface, causing potentially significant increases in overall force necessary to trigger disengagement.
OK?
Now, the body –
The rider triggers release from the pedal by rotating the foot medially or laterally –
(Generally speaking, we always try to release using medial rotation. There are lots of sharp spinning parts providing a disincentive for release motions that lean in towards the bike.)
Medial rotation of the foot is a result of medial/internal rotation of the hip
knee,
…some combination of the two, or rotation of the entire body.
The range of these rotational joint moments is limited. Here are some observed norms, if you’re interested –
What the hell does this have to do with cyclocross?
Bear with me.
When we dismount the bike, We’re trying to get off (the bike)
– Quickly
– smoothly
– efficiently
– without hitting the deck
Knowing how the mechanics of the pedal/shoe interface and the related body parts function, we can think logically about how best to do this.
Here’s how I described a super-basic “Cowboy” dismount in a previous post –
1. Unclip right foot.
2. swing right foot over saddle, behind left leg.
3. Left foot stays clipped in. Right side of leg/ass braces against saddle.
4. r hand leaves bar, braces on top tube.
5. Coast in this position.
6. left foot unclips.
7. DROP to ground. Do not step down, right foot is totally passive. Simply drop to ground as you unclip left foot.
Here’s why the dismount breaks down this way, with reference to everything above…
1. Unclip right foot.
Gotta start somewhere, right?
2. swing right foot over saddle, behind left leg.
We’re doing this “cowboy” style. More on the “step through” style later…
3(a). Left foot stays clipped in.
…more on this later.
3(b). Right side of leg/ass braces against saddle.
Bracing the right side of the leg against the top tube stabilizes the body in a position that will allow for sufficient ROM to disengage from the pedal, and provides for an additional point of contact with the bike, increasing control of the bike during the dismount.
4. r hand leaves bar, braces on top tube.
bracing the hand on the top tube reinforces vertical stability of the body, helping to control the tendency of the foot to supinate
during medial rotation. Hand on top tube also helps to control bike, facilitates shouldering/portaging after dismount.
5. Coast in this position.
We use this coasting phase to sight the dismount and to prepare for…
6. left foot unclips.
The body is held stable, in alignment, and within the ROM necessary to release the cleat from the pedal. There should be no difficulty with release unless resistance multipliers are present…
7. DROP to ground. Do not step down, right foot is totally passive. Simply drop to ground as you unclip left foot.
The key is dropping to the ground after cleat disengagement.
By suspending the body in the correct position using the hands and hip (per 1-4 above,) we facilitate the conditions necessary for safe disengagement.
Attempting to step towards the ground, or dismount motions of the body disturbing the established equilibrium can and will result in an increased likelihood of a failure to disengage, and subsequent danger of crash/collision.
————————————————–
Whatever controversy there is regarding the method of dismount I describe here appears largely to append to my “don’t unclip the left foot first” recommendation.
Please allow me to emphasize that I do advocate releasing the foot prior to making any sort of “exiting the bike” motion. I do not, however, teach the method taught by many, espoused by nearly all of the East-Coast luminaries, and described (excellently) by Adam Myerson in his blog.
Here’s what Adam wrote in the comments section of an earlier post on the topic –
…I advocate clipping out of the left first when you have time to do so, and don’t need to be on the gas all the way to the dismount point. It’s much easier to step off a bike you’re not still attached to.
I advocate staying clipped in on the left when you have to pedal all the way up to the dismount point, and when you’re not stepping through.
I advocate stepping through ONLY when clipped out of the left already, and when you have ample speed and coasting time to take the extra time needed to step through.
Option 1 works every time, in every condition, and I consider it the default.
Respectfully.
I think -at the most basic level- we agree where it really counts.
Unclip before you begin any motion that leads to or constitutes “stepping off” of the bike.
I can understand why the “Unclip before stepping over” approach works, and is popular with many riders. It’s a good way to get off the bike.
I don’t use it myself, and therefore I don’t teach it.
Why don’t I use it?
As explained well in the Cycle-Sport Blog post, this dismount method -while very effective – is not universally applicable, and is not optimal under conditions such as “…uphill dismounts, deep mud, last minute dismounts….” (I would also add sand to the list.)
Believe it or not (and I know I’m straining credulity writing this after forcing you to wade through this ridiculous post,) I’m all about simplicity.
If I can teach one technique that works all the time, or two techniques, one of which only works most of the time, I’m going with the one that works all the time.
Honestly, though?
I think this may largely be an East-Coast/West Coast thing. The main reason I don’t use the “unclip first” method is because I learned early on that on the rutty, crappy, chuckhole infested minefield disaster courses of Seattle in the 90′s, if you tried to ride into a barrier hanging off the side of the bike balanced on an unclipped pedal, you were pretty likely to get bounced off the pedal, and flat onto your ass.
It just wasn’t a good default position for the courses out here, and really… it still probably isn’t.
Above all else, figure out what works best for the the courses *you* ride on, practice it, wire it, and go fast.
Nothing wrong with either approach, just…
—————————————————————
* Yeah, yeah, I know… “what about crank bros, Speedplay, Time, etc.”?
The details are slightly different, but in all the commonly used “mountain bike” pedals, the function of the pedal still follows the same basic formula.
** ”What about the “step through?”
Save that thought. We’ll get there.
*** “Hey! What about a workout for today!?!?!*
Oh yeah. That.
Get on your bike. Go find a grassy field.
Practice clipping and unclipping, giving extra consideration to all the stuff above.
Everybody can always stand to get this stuff more wired in, especially this early in the (pre) season.
Have fun,
M
Hey! Have I told you yet that I’m one of the coaches at…
It’s Tuesday, and if you’ve been playing along with us in previous seasons, I bet you can guess what’s on tap for today.
Say “Hello”…
It’s…
2×20 Tuesday!
The 2×20 is kind-of the swiss army knife of workouts, and can honestly serve as the primary building block of your fitness. As such, it’s a great default workout. Short on time? Not sure what to do? Do these.
The 2×20 isn’t just a staple workout, though. It can also double as a test session; a regular, oft-repeated gauge of your fitness.
That’s a big part of what we’re after today, as we embark upon our season-long CX journey. We’re setting a baseline for all the workouts you’ll do as the year rolls on.
Keep track of your performance in this, and in all of the 2×20′s you do!
Ideally, you want to keep track of your performance in all your workouts, but it’s extra-special super-duper important with these. You’re going to do them on a pretty regular basis, and if you keep track of ‘em, you’ll find that you’ve left a really good trail of bread crumbs behind you all season.
It doesn’t really matter how you do this keeping-track-of. Wattage, heart rate, what gear you’re pushing on the trainer, whatever. Just figure out some way of consistently measuring your performance during the workout, and write it down/download it/etch it in runes on a stone tablet…
Just try to track this stuff, ok?
Every time.
It’s great if you have a wattage measuring device, but it isn’t critical. If you do these intervals on a trainer, you can record your cadence and gear ratio, and you can track your progress that way.
Say today you ride these on your trainer, with a fixed resistance, in a 53×14 at 80 rpm.
Next time out? 53×14 at 85 rpm.
Time after that? Back to 80 rpm, but this time you were able to roll ’em on a 53×13.
Progress! And you can see it on paper (or your stone tablets)!
Yay!
It’s all about establishing some kind of metrics to keep track of…
Cool.
We will be referring to these metrics throughout the season, and your level of output in the 2×20 will form the basis for determining your target output in most of the workouts we do from here on out.
So, hey… what the heck is this 2×20 thing?
Pretty simply, the 2×20 looks like this:
– Warm up.
– Go as hard as you can for 20 minutes.
– Recover for 5 minutes.
– Go again for another 20 minutes.
That’s the basic version. Success on this is, however, all in the details.
First of all, warm up.
No, seriously. Don’t just hop on the bike and blast one out.
Warming up makes a difference, especially if you’re doing this as a test session.
You don’t need to do anything super hard or super involved, just make sure the legs are up and running before you kick off the workout proper.
Spin for a bit, blast a couple of 30 second to 2 minute efforts off pretty hard, spin a bit more, then go for it.
When you do go for it, really go for it.
But in a controlled sort of way.
The idea here is to go as hard as you can for the duration of both intervals without being forced to go easier at the end of the second interval. If you run out of gas before you finish the second interval, you went to hard. If your vision isn’t blurry at the end of the second interval, you went too easy.
If you’re doing this with a powermeter, you want your wattage output to be as close to constant as possible. How constant?
Can you keep it in a 10 watt range?
Probably not.
15 watts?
More likely
20 watts?
Try.
Keep it steady.
These take practice to do well, and the better you get, the harder they get (you’re welcome.) This is a workout that’s a natural for the turbo trainer, and that’s how I do ‘em.
This is a good thing, because I always wind up flat on my back on the floor trying not to puke after the 2nd interval.
I’m really not kidding about the blurry vision thing. You should aspire to seeing-spots level of output on these.
If you can learn to push through your limits, really push, you will get better and you will get better fast.
It’ll be painful, though.
I promise.
Have fun!
M
PS –
In the Seattle area where I live, Tuesday nights are a local weekday circuit race, for a couple/few more weeks, at least.
That’s what I’m doing tonight. Maybe you should, too. If you’re up for it, think about taking advantage of the remnants of your local road racing season to train up for Cross. Get it when you can, while you can. There probably aren’t all that many road/mtb. racing opportunities left before cross starts up…
You betcha. I do the personal coaching/trainer thing. Clients have included multiple National and even World Champions, and 2/3 of My Cyclocross athletes made the podium at Nationals in 2009, with one taking home the Stars and Stripes. Interested? Drop me a line at: crosssports@gmail.com
Yeah, that's right... if you have completely lost control of all sense of fiscal responsibility, you can now purchase silly articles of clothing with my blog address on them.
How cool is that?
Just go to - http://crosssports.spreadshirt.com/
and think "conspicuous consumption... mmm... feels so good..."